Thank you to all who commented on the new blanket. I received a couple of comments asking how I went about joining the granny squares together as I was obviously not waiting till I'd finished making all my squares before doing so. The answer is... join as you go. For me, it's the best way. It's quick as it eliminates an additional (and time consuming) step in the blanket making process. I like the effect as it keeps the blanket smooth on both sides (unlike the thick seam you get on one side when crocheting completed squares together), and it stretches the corners of the squares together nicely too so there should be no need to block them. One possible downside is that you need to be reasonably relaxed about how you position the squares as you can't lay out all the completed squares before deciding where to put them. Joining squares using this method is possible when there are regular chain spaces in the previous round, traditional granny squares are therefore ideal.
I thought I'd illustrate my method with a few more photos. I'd hesitate to call it a tutorial as it's perhaps a bit rough and ready compared to other tutorials out there.
My final square size is five rounds. First of all I crochet enough "four round" squares in random colour choices to complete the next row, plus a few extra squares for flexibility in choosing. I then lay them out as above to pick the fifth round colour. I try to keep the colours and tones evenly spread as much as possible without being too fussy.
Next I pick the first square (bottom right above, though you can start from either end) and start to crochet the final round.
I crochet along one side as normal then stop before the top right corner chain (the pattern I'm using just has one chain at the corners).
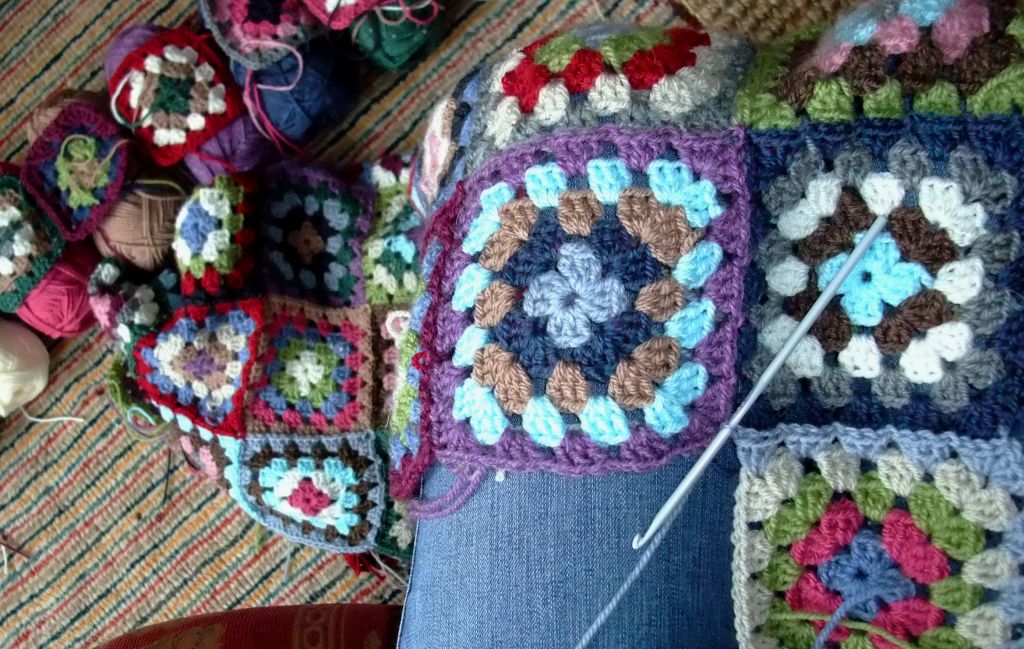
I then bring the blanket up onto my knee. I'll be joining to the square with the deep blue edge so I put the crochet hook through the bottom right corner space of this square (from front to back)...
wrap the yarn...
and pull through the space and the loop on the needle to make the
chain stitch through the space and connect the two squares.
Then make the next stitches in the round as normal (here: 3 x UK trebles) and when you reach the next chain stitch put the needle through the corresponding chain space on the blanket square before making the chain stitch.
Repeat along the side...
...till you reach the corner. At corners I put a chain through each adjacent corner, so here I chain through the dark blue corner then chain though the purple corner...
before carrying on and completing the rest of the round as normal.
Then take your next square to be added and continue the process.
This time starting the join at the bottom left of the square you've just added.
When you reach the top left corner there are three adjacent corners. Chain through the pale blue one...
...the dark blue one...
...and the purple one...
Then carry along the top row, chaining through the adjacent square whenever you reach a chain stitch.
Two adjacent corners here, make a chain stitch through each...
Then complete as normal. I hope this all makes sense! Please let me know if anything's not clear.
I have to say, I don't usually place the blanket so neatly on my knee when I do this so sometimes my tension is a little variable but it doesn't seem to be significant enough to affect the overall look of the joins. The first time you do it you feel like you need another hand to hold everything together, but you'll soon get the knack.
The next day, and now all the squares have been joined along the bottom row. Time to make more squares for the next row... I'm intending to make this blanket be big enough to sit on top of a king size bed.
And I couldn't finish without a little cat photo. This time she was happy to stay on the seat though.
In a later post I'll list the yarns I'm using. They're all Stylecraft, a mix of Special and Life.
Blanket inspiration came from Pixie's beautiful blanket (
here) and ViolaViola's lovely blanket
(here).


16 comments:
Your blanket is coming along nicely. There is a continuous join as you go method if you are doing the joining rounds in the same colour which is super easy as you don't have all the ends to weave in. I found it on Youtube. Yours is a great tutorial for individual join as you go. x
A perfect tutorial thanks so much for sharing it. The colors are just perfect.
Hugs,
Meredith
Thank you for taking the time to post that. I just think the colours that you are using are so lovely.
Colette xx
I just found your blog through Bunny Mummy and became a follower. Your granny square blanket looks really nice; I like all the colors. Thank you for taking the time to post all the pictures of the join as you go method; they're very helpful.
Blessings,
Kate
arh so thats how it is done...thanks!
xxx
This is brilliant, thanks for sharing it! I like the way you work out the final colours row by row so it's random but not totally random. It looks fantastic, by the way!
Blanket looks fab....can't believe the blanket was in a horizontal position lon enough to take a pic, without the cat jumping on it. In our house, new anything 'has' to be slept on by our two cats.
Have a great weekend!
I really love this blanket, the colours are perfect. Am feeling inspired - which is great because it has been really lacking recently. X
Hi Anne, I love how this blanket is looking...the out doors pics in your previous postare my favourite....the colours look so pretty . I would not have guessed it is Stylecraft...I need to get a few of the quieter colours , they really make a lovely vintage look.
About the hexagons ...I hadn't noticed . I seem to be doing ok with them...some don't match up perfectly but this type of patchwork is pretty forgiving. Will check the templates when I have some that are not in use . Thanks
Jacquie x
I'm in the process of making a squares blanket too, but am embedded in the NOT joined as you go part. 80 squares connected, 40 to go.
If I ever come back to a squares project--I'm pretty burnt out on this right now--I am going to try your way.
beautiful crochet and your home looks so cosy and comforting! what a lovely place to be ;0)x
Wow, I love the movement and the colours in this one. I seem to have missed the previous post - will have to look it up.
Great tutorial - I was especially interested by the 4-corner join as I just went through that issue with a pillow I made.
The blanket is coming along a treat,,great colours, its gonna look really spiffy when it all finished and hanging over your bed.
x
Hey Ann, this blanket looks great....from a distance the colours have a lovely 'soft', look to them. The sort of blanket you want to snuggle under with a cuppa and a good book and stay there for hours.
Great to see how you join as you go and how you choose colours for the next round.
It will look amazing when it's finished.....
Claire :}
Ooooh this is my favourite set of colours for a blanket to date - they are really lovely, in fact it's pretty much the colour palette I wear. I've bookmarked this post in the hope that one day I will actually learn to crochet. One day. Bethx
Awesome blog you have here but I was curious
if you knew of any user discussion forums that cover the same topics discussed in this
article? I'd really like to be a part of community where I can get feedback from other knowledgeable people that share the same interest. If you have any suggestions, please let me know. Bless you!
Here is my website ... compare
Post a Comment